Chapter 3-2: Getting Started |
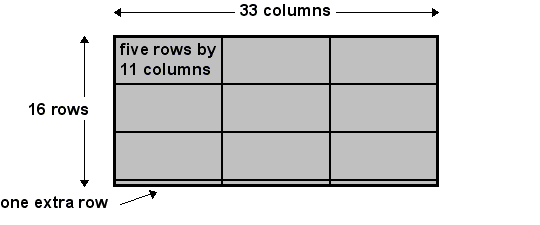
Matrix Scrolling Mode In matrix scrolling, APPX divides a frame into a number of equally sized regions based upon a composite maximum image size. This composite image is large enough to accommodate any of the possible alternate images for the frame, regardless of which one actually displays. APPX calculates this composite size in two ways by: combining the width of the alternate image that has the largest Columns specification, and the height of the image that has the largest Rows specification; and adding any extra rows or columns you defined to border the image. APPX then calculates the maximum number of regions that will fit down the frame and the maximum number of regions across the frame, based upon this composite image. Any extra space is evenly distributed between the regions. For example, assume your frame size is 16 rows by 33 columns, as shown below. You defined two alternate images for the frame: one is three rows by 10 columns and the other is five rows by seven columns. You did not specify extra rows or columns. The composite image is five rows by 10 columns. This composite image can be displayed three times down the frame (calculated by dividing 5 into 16) and three times across the frame (10 into 33), leaving one extra row and three extra columns. To evenly distribute the remaining space, APPX allocates five rows and 11 columns to each region in the matrix, and leaves one extra row at the bottom of the frame.
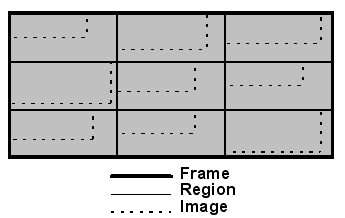
Region Allocation within a Frame Because the regions are based upon a composite image size, rather than the actual size of each alternate image within a frame, the images in matrix scrolling are always perfectly aligned. Regardless of the alternate images selected, all images in the same row have the same row axis coordinate, and all images in the same column have the same column axis coordinate, as shown below.
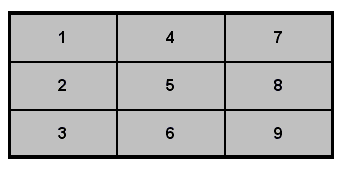
The Positioning of Alternate Images in a Frame For both input and output processes, you determine the sequential placement of images within the regions by requesting one of the following two matrix scroll types. The upper-left corner of each region is the starting coordinate for a selected image. Down, APPX places the first image in the upper left corner of the frame. Succeeding images are placed immediately below the previous image until the column is complete. The next image is placed at the top of the column immediately to the right of the completed column and the first image. As each column completes, the next image begins a new column until all columns complete.
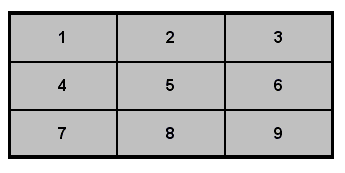
Down Scrolling Across. APPX places the first image in the upper left corner of the frame. Succeeding images are placed immediately to the right of the previous image until the row is complete. The next image is placed in the far left-hand position of the row immediately below the completed row and the first image. As each row complete, the next image begins a new row until all rows complete.
Across Scrolling |
Application Design Manual "Powered by Appx Software"266 ©2006 By APPX Software, Inc. All Rights Reserved |